-
Spring Boot API - Swagger, Actuator, HAL ExplorerFrameWork/Spring&Spring-boot 2024. 2. 21. 14:41
Swagger + Spring Boot 3.x
implementation group: 'org.springdoc', name: 'springdoc-openapi-starter-webmvc-ui', version: '2.2.0'@OpenAPIDefinition( info = @Info(title = "My Resful Service API 명세서", description = "Spring Boot로 개발하는 RESTful API 명세서 입니다.", version = "v1.0.0" ) ) @Configuration @RequiredArgsConstructor public class SwaggerConfig { @Bean public GroupedOpenApi customTestOpenAPI(){ String[] path = {"/users/**", "/admin/**"}; return GroupedOpenApi .builder() .group("일반 사용자와 관리자를 위한 User 도메인에 대한 API") .pathsToMatch(path).build(); } }String[] path = {"/users/**", "/admin/**"}; 는 users와 admin에 해당하는 API만 스웨거를 통해서 공개하겠다는 의미이다.

Entity 등록하기
@Data
@AllArgsConstructor
@JsonIgnoreProperties(value ={"password","ssn"})
public class User {
    @Schema(title = "사용자 ID", description = "사용자 ID는 자동 생성된다.")
    private Integer id;

    @Schema(title = "사용자 이름", description = "사용자 이름을 입력합니다.")
    @Size(min = 2 , message = "Name은 2글자 이상 입력해 주세요")
    private String name;

    @Schema(title = "등록일", description = "사용자의 등록일을 입력해 주세요")
    @Past(message = "등록일은 미래 날짜를 입력하실 수 없습니다.")
    private Date joinDate;

    //@JsonIgnore
    @Schema(title = "비밀번호", description="사용자의 비밀번호를 입력해주세요")
    private String password;

    //@JsonIgnore
    @Schema(title = "주민번호",description = "사용자의 주민번호를 입력해 주세요")
    private String ssn;
}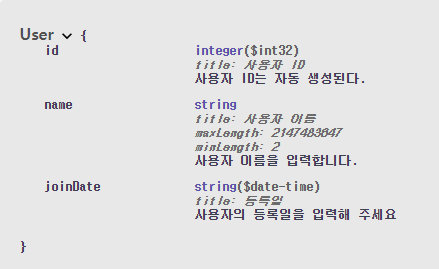
Controller의 특정 URI 정보 스웨거에 등록
 @GetMapping("/users")
    public List<User> retrieveAllUser(){
        return service.findAll();
    }

    @Operation(
    summary = "사용자 정보 조회 API",
    description = "사용자 ID를 이용해서 사용자 상세 정보를 조회")
    @ApiResponses({
            @ApiResponse(responseCode = "200", description = "OK !!"),
            @ApiResponse(responseCode = "400", description = "BAD REQUEST !!"),
            @ApiResponse(responseCode = "404", description = "USER NOT FOUND !!"),
            @ApiResponse(responseCode = "500", description = "INTERNAL SERVER ERROR !!")
    })
    @GetMapping("/users/{id}")
    public EntityModel<User> retrieveUser(
            @Parameter(description = "사용자 ID", required = true, example = "1")
            @PathVariable int id){
        User user = service.findOne(id);

        if(user == null){
            throw new UserNotFoundException(String.format("ID[%s] not found", id));
        }

           EntityModel entityModel = EntityModel.of(user);

        //this는 User클래스를 가르킨다.
        //
        WebMvcLinkBuilder linTo = linkTo(methodOn(this.getClass()).retrieveAllUser());
        entityModel.add(linTo.withRel("all-users"));  // all - users -> http://localhost:9000/users

        return entityModel;
    }
Spring Boot Actuator(액추레이터)
implementation group: 'org.springframework.boot', name: 'spring-boot-starter-actuator', version: '3.2.1'Actuator는 스프링 부트가 가지고 있는 기본적인 기능에다가 모니터링과 로깅 정보와 같은 것을 제어할 수 있도록 제공하는 서포트 라이브러리이다.
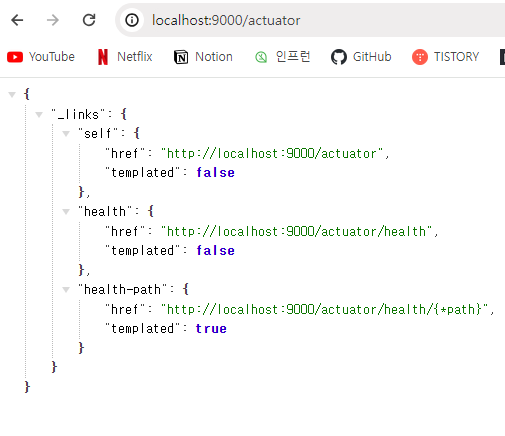
사용하고 있는 localhost 포트 번호에 /actuator 경로로 접속하면 위와 같은 정보를 확인할 수 있다. 해당 프로젝트의 상태를 체크 할수있는 URL의 정보를 담고 있다.
관리하고 싶은 정보 설정
management.endpoints.web.exposure.include=*management.endpoints.web.exposure.include=self,health,beans{ "_links": { "self": { "href": "http://localhost:9000/actuator", "templated": false }, "beans": { "href": "http://localhost:9000/actuator/beans", "templated": false }, "caches-cache": { "href": "http://localhost:9000/actuator/caches/{cache}", "templated": true }, "caches": { "href": "http://localhost:9000/actuator/caches", "templated": false }, "health": { "href": "http://localhost:9000/actuator/health", "templated": false }, "health-path": { "href": "http://localhost:9000/actuator/health/{*path}", "templated": true }, "info": { "href": "http://localhost:9000/actuator/info", "templated": false }, "conditions": { "href": "http://localhost:9000/actuator/conditions", "templated": false }, "configprops": { "href": "http://localhost:9000/actuator/configprops", "templated": false }, "configprops-prefix": { "href": "http://localhost:9000/actuator/configprops/{prefix}", "templated": true }, "env": { "href": "http://localhost:9000/actuator/env", "templated": false }, "env-toMatch": { "href": "http://localhost:9000/actuator/env/{toMatch}", "templated": true }, "loggers": { "href": "http://localhost:9000/actuator/loggers", "templated": false }, "loggers-name": { "href": "http://localhost:9000/actuator/loggers/{name}", "templated": true }, "heapdump": { "href": "http://localhost:9000/actuator/heapdump", "templated": false }, "threaddump": { "href": "http://localhost:9000/actuator/threaddump", "templated": false }, "metrics-requiredMetricName": { "href": "http://localhost:9000/actuator/metrics/{requiredMetricName}", "templated": true }, "metrics": { "href": "http://localhost:9000/actuator/metrics", "templated": false }, "scheduledtasks": { "href": "http://localhost:9000/actuator/scheduledtasks", "templated": false }, "mappings": { "href": "http://localhost:9000/actuator/mappings", "templated": false } } }사용하고 있는 localhost 포트 번호에 /actuator 경로로 접속하면 management.endpoints.web.exposure.include를 설정하기 전보다 더 많은 모닝터링 경로가 반환된다. 위 형태에 json 정보가 반환되는데 *로 모두다 출력할 수도 이고 위에 나열된 정보 중 몇개를 선택해서 반환 받을 수도 있다.
HAL Explorer
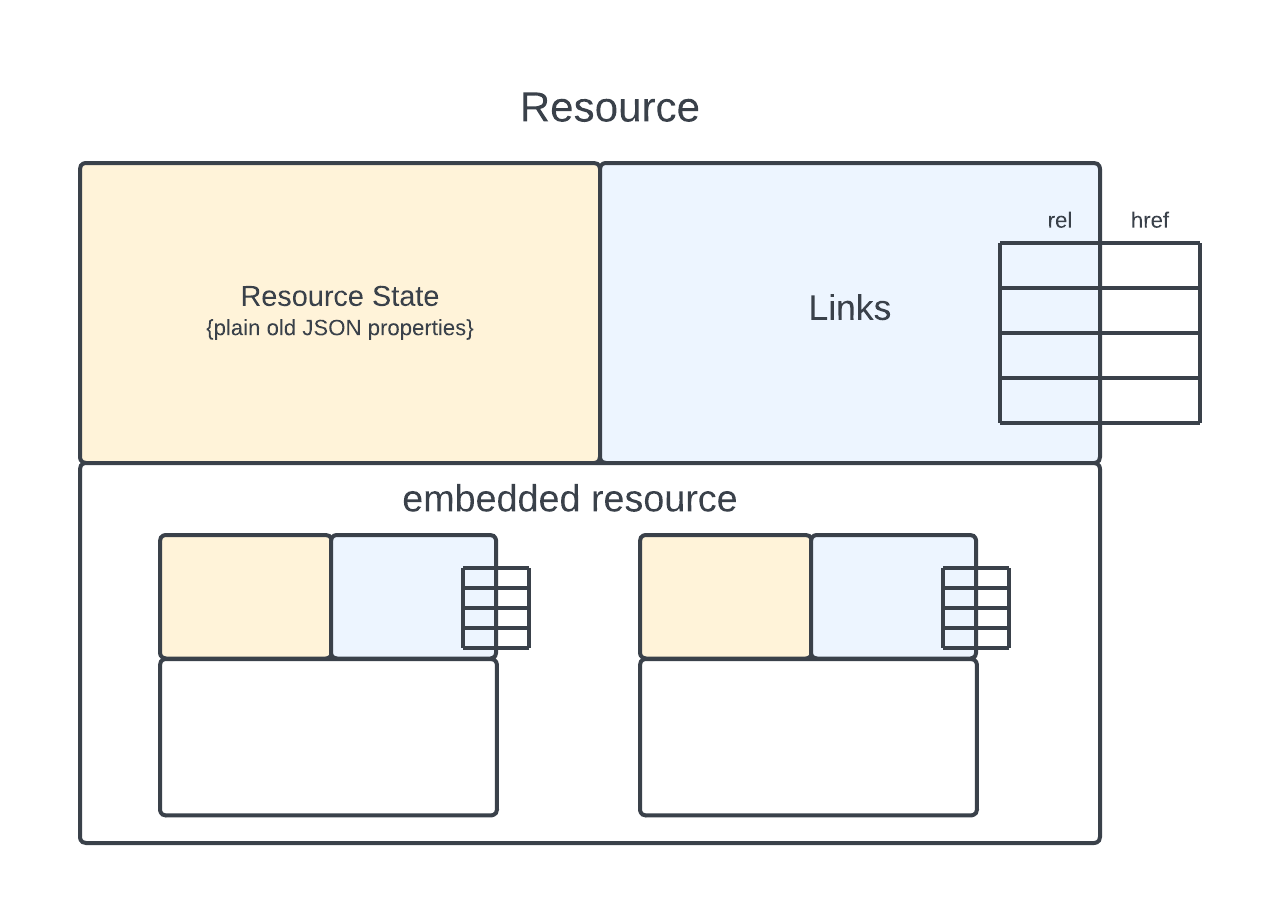
implementation group: 'org.springframework.data', name: 'spring-data-rest-hal-explorer', version: '4.2.3'HAL Explorer는 REST API 설계 시 response 정보에 부가적인 정보를 서비스해주는 기능이다. 덧붙여 설명하자면 REST API를 설계할 때 response 메시지의 포맷과는 상관없이 API를 쉽게 사용할 수 있도록 하이퍼링트 형식으로 제공해준다.
HAL Browser(deprecated)
- Hypertext Application Languge
- "HAL 은 간단한 포맷이다." API 리소스간 하이퍼링크에 일관되고 쉬운 방법을 제공해 준다.
- http://localhost:9000/explorer/index.html#uri=/
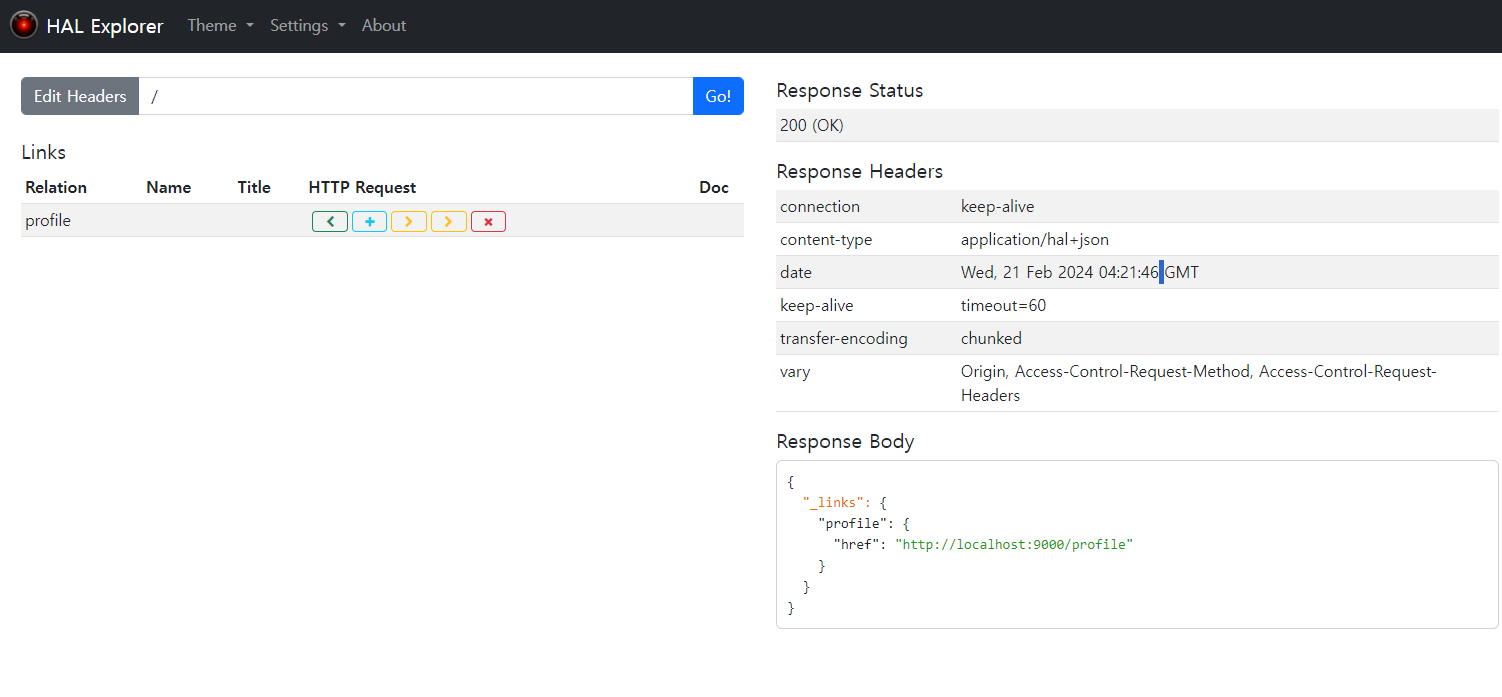
위 uri로 접속하게 되면 HAL Exploer로 연결이되고
- http://localhost:9000/actuator/
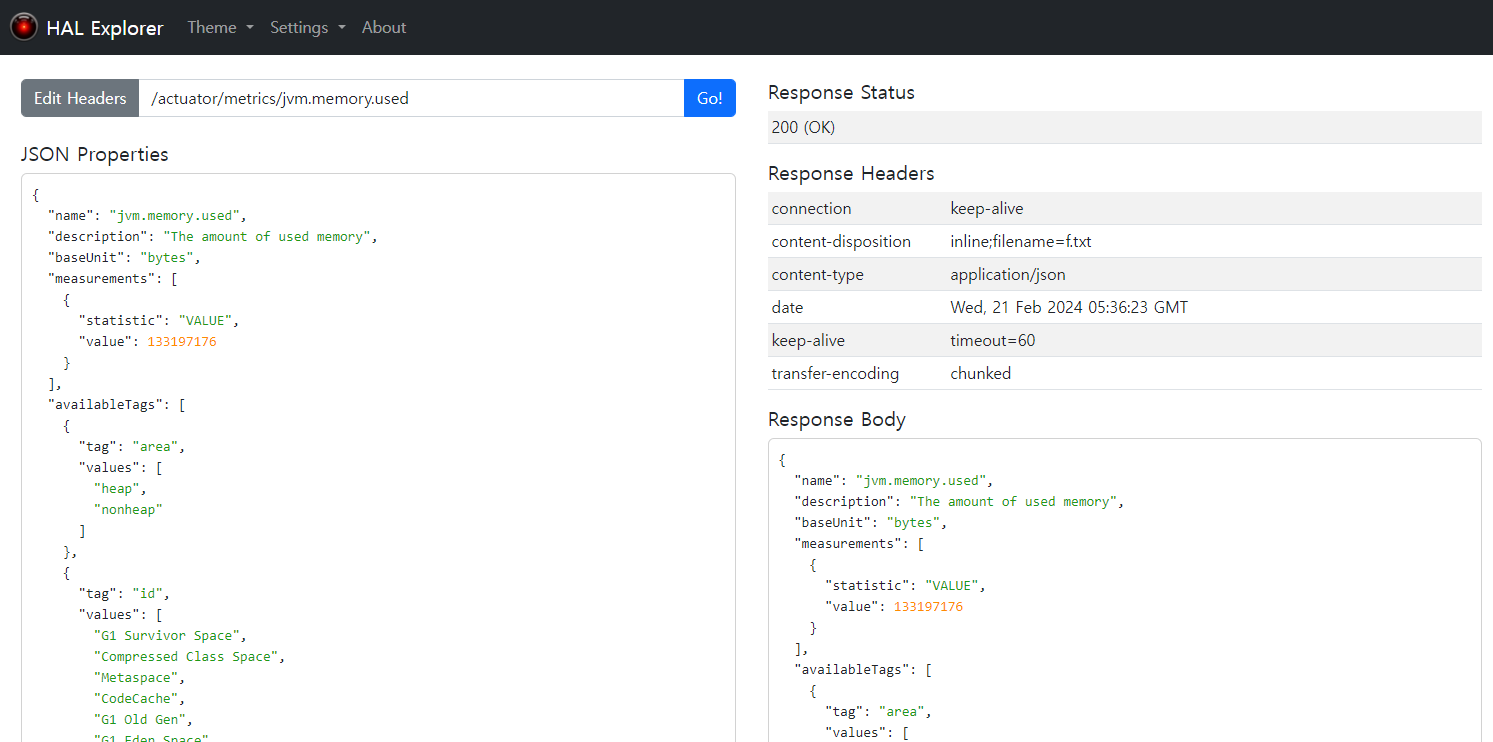
- http://localhost:9000/actuator/metrics/
- http://localhost:9000/actuator/metrics/jvm.memory.max
위와 같은 uri를 통해 확인할 수 있는 정보들을 어떤식으로 사용할 수 있는지 어떤 값으로 얻을 수 있는지 HAL Exploer를 통해서 확인 할 수 있다.
이전에 HATEOAS 기능을 이용해서 리소스 요청을 했을 때 link에 사용가능한 리소스 정보를 연결하는 기능도 이전 게시물에서 살펴보았다. 그 기능과 더불어서 HAL 정보를 사용하게 되면 JSON정보로 표현되어 질 수 있는 리소스를 좀더 자유롭고 편하게 사용할 수 있다.
⭐⭐HAL Browser 기능을 사용하면 REST 자원을 확인하기위해 management.endpoints.web.exposure.include=self,health,beans 와 같이 application.properties에 그때 그때 설정을 해주지 않아도 HATEOAS 기능을 바로 연결해서 사용할 수 있다. HATEOAS 기능과 더불어서 RESTful API를 설계를 할 때 응용해서 사용하면 보다 효율적이고 확장 가능한 API를 설계할 수 있다.
[출처 - Spring Boot 3.x를 이용한 RESTful Web Service 개발, 저 Dowon Lee]
https://www.inflearn.com/course/spring-boot-restful-web-services
[개정판 2023-11-27] Spring Boot 3.x 를 이용한 RESTful Web Services 개발 강의 - 인프런
이 강의는 Spring Boot를 이용해서 RESTful Web Services 애플리케이션을 개발하는 과정에 대해 학습하는 강의으로써, REST API 설계에 필요한 기본 지식에 대해 학습할 수 있습니다., 스프링 부트 RESTful API
www.inflearn.com
'FrameWork > Spring&Spring-boot' 카테고리의 다른 글
Spring Core - 로그 추적기(프로토타입, V1) (1) 2024.03.04 Spring Boot API - Spring Security (0) 2024.02.21 Spring Boot API - User Service, Exception Handing... (0) 2024.02.19 SpringBoot - Bean추가, Configuration, Path Variable (0) 2024.02.19 SpringBoot - SpringBoot API 시작하기 (0) 2024.01.31