-
Spring 기본 37 - 웹 스코프(request스코프 예제 만들기)FrameWork/Spring&Spring-boot 2023. 11. 30. 14:39
웹 스코프
웹 스코프의 특징
- 웹 스코프는 웹 환경에서만 동작한다.
- 웹 스코프는 프로토타입과 다르게 해당 스코프의 종료시점까지 관리한다. 따라서 종료 메서드가 호출된다.
웹 스코프 종류
- request : HTTP 요청 하나가 들어오고 나갈 때 까지 유지되는 스코프, 각각의 HTTP 요청마다 별도의 인스턴스가 생성되고, 관리된다.
- session : HTTP Session과 동일한 생명주기를 가지는 스코프
- application : 서블릿 컨텍스트(`ServletContext`)와 동일한 생명주기를 가지는 스코프
- websocket : 웹 소켓과 동일한 생명주기를 가지는 스코프
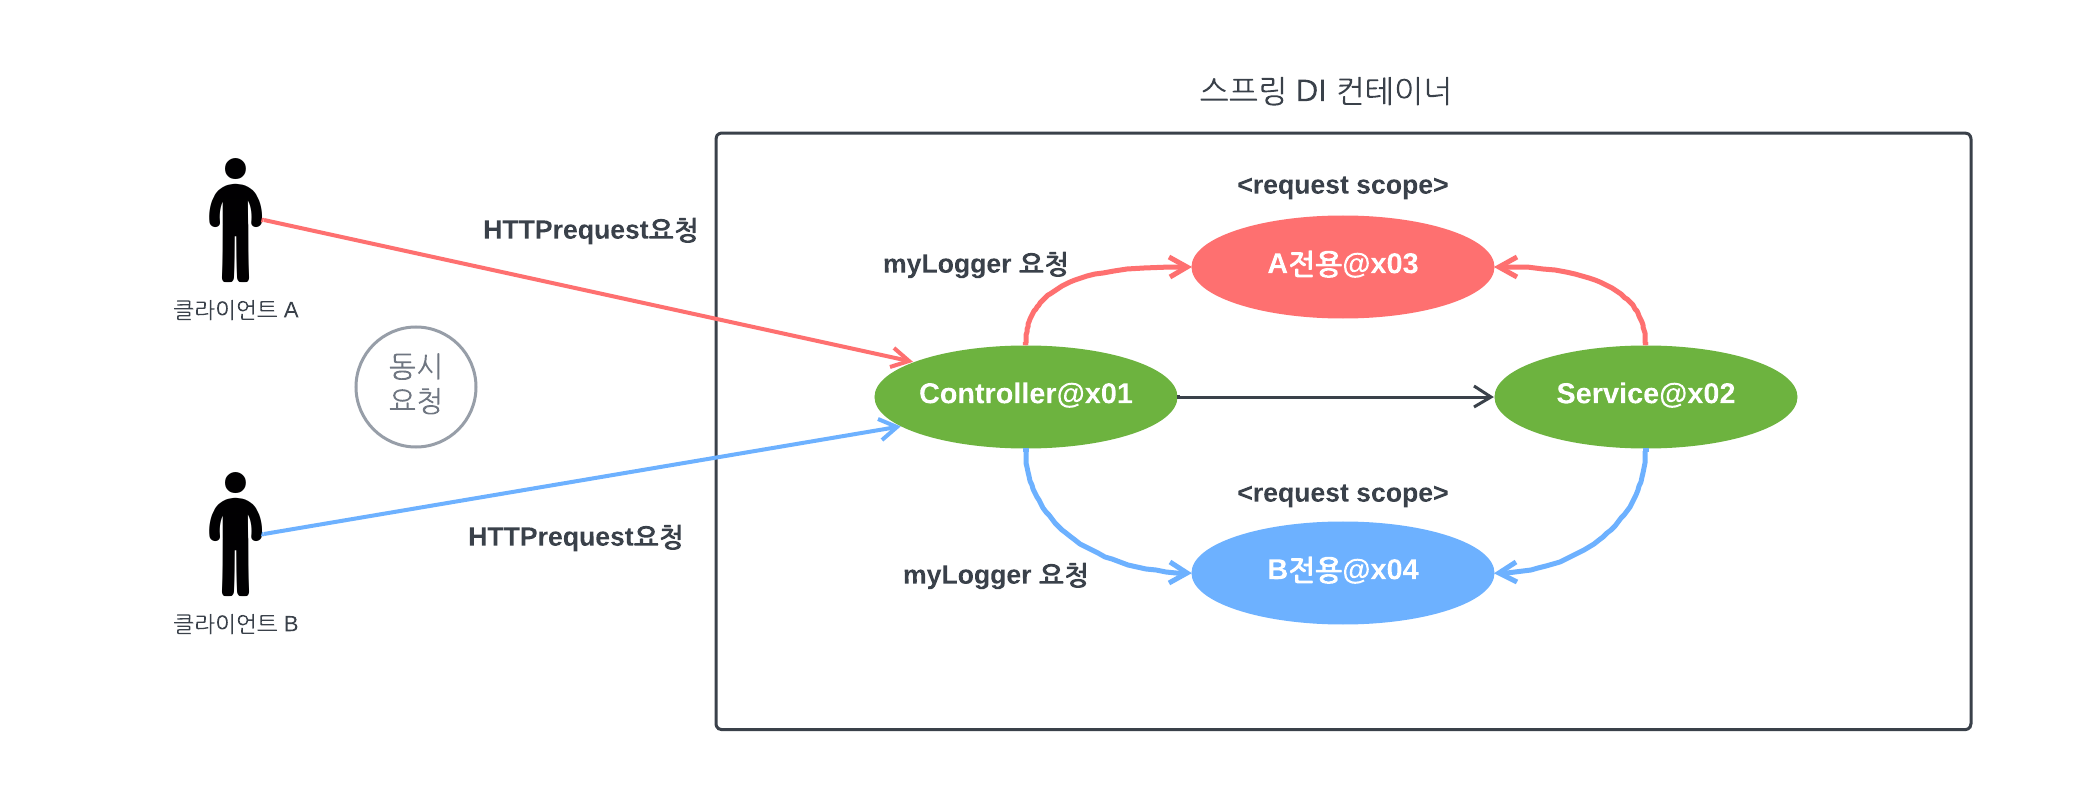
request스코프를 예제로 알아보자
HTTP request 요청 당 각각 할당되는 request 스코프
Request스코프 예제 만들기
웹 환경 추가
웹 스코프는 웹 환경에서만 동작하므로 web화견이 동작하도록 라이브러리 추가
build.gradle에 추가
implementation 'org.springframework.boot:spring-boot-starter-web'이제 `hello.core.HelloApplication`의 main메서드를 실행하면 웹 애플리케이션이 실행되는 것을 확인할 수 있다.
➕참고
spring-boot-starter-web 라이브러리를 추가하면 스프링 부트는 내장 톰켓 서버를 활용해서 웹 서버와 스프링을 함께 실행시킨다.➕참고
스프링 부트는 웹 라이브러리가 없으면 `AnnotationConfigApplicationContext`을 기반으로 애플리케이션을 구동한다. 웹 라이브러리가 추가되면 웹과 관련된 추가 설정과 환경들이 필요하므로`AnnotationConfigServletWebServerApplicationContext`를 기반으로 애플리케이션을 구동한다.동시에 여러 HTTP 요청이 오면 정확히 어떤 요청이 남긴 로그인지 구분하기 어렵다. 이럴때 사용하기 딱 좋은 것이 바로 request 스코프이다.
다음과 같이 로그가 남도록 request스코프를 활용해서 추가 기능을 개발해보자
[dd08997g...] request scope bean create
[dd08997g...] [http://localhost:8080/log-demo] controller test
[dd08997g...] [http://localhost:8080/log-demo] service id = testId
[dd08997g...] request scope bean close- 기대하는 공통 포멧 : [UUID][requestURL][messagre]
- UUID를 사용해서 HTTP 요청을 구분하자
- requestURL 정보도 추가로 넣어서 어떤 URL을 요청해서 남은 로그인지 확인하자
request 스코프 예제 개발
동시에 여러 HTTP 요청이 오면 정확히 어떤 요청이 남긴 로그인지 구분하기 어렵다. 이럴때 사용하기 딱 좋은 것이 바로 request스코프다.
package com.hello.core.common; import org.springframework.context.annotation.Scope; import org.springframework.stereotype.Component; import javax.annotation.PostConstruct; import javax.annotation.PreDestroy; import java.util.UUID; @Component @Scope(value = "request") public class MyLogger { private String uuid; private String requestURL; public void setRequestURL(String requestURL) { this.requestURL = requestURL; } public void log(String message){ System.out.println("[" + uuid + "]" +" [" + requestURL +"] " + message ); } @PostConstruct public void init(){ uuid = UUID.randomUUID().toString(); System.out.println("[" + uuid +"] request scope bean create:" + this); } @PreDestroy public void close(){ System.out.println("[" + uuid +"] request scope bean close:" + this); } }- 로그를 출력하기 위한 `MyLogger`클래스이다.
- `@Scope(value ="request")`를 사용해서 request 스코프로 지정했다. 이게 해당 빈은 HTTP 요청 당 하나씩 생성되고,HTTP 요청이 끝나는 시점에 소멸된다.
- 해당 빈인 생성되는 시점에 자동으로 `@PostConstruct`초기화 메서드를 사용해서 uuid를 생성해서 인스턴스에 보관된다. 해당 빈은 HTTP 요청 당 하나씩 생성되므로, uuid를 저장해두면 다른 HTTP요청과 구분할 수 있다.
- 이 빈이 소멸되는 시점에 `@PreDestroy`를 사용해서 종료 메시지를 남긴다.
- `requestURL`은 이 빈이 생성되는 시점에는 알 수 없으므로, 외부에서 setter로 입력 받는다.
LogDemoController
package com.hello.core.web; import com.hello.core.common.MyLogger; import lombok.RequiredArgsConstructor; import org.springframework.beans.factory.ObjectProvider; import org.springframework.stereotype.Controller; import org.springframework.web.bind.annotation.RequestMapping; import org.springframework.web.bind.annotation.ResponseBody; import javax.annotation.PostConstruct; import javax.servlet.http.HttpServlet; import javax.servlet.http.HttpServletRequest; @Controller @RequiredArgsConstructor public class LogDemoController { private final LogDemoService logDemoService; private final MyLogger myLogger; @RequestMapping("log-demo") @ResponseBody public String logDemo(HttpServletRequest request){ String requestURL = request.getRequestURL().toString(); myLogger.setRequestURL(requestURL); myLogger.log("controller test"); logDemoService.logic("testId"); return "OK"; } }- 로거가 잘 작동하는지 확인하는 테스트용 컨트롤러다.
- 여기서 HttpServletRequest를 통해서 요청 URL울 받았다.
- requestURL값 `http://localhost:8080/log-demo`
- 이렇게 받은 requestURL 값을 myLogger에 저장해둔다. myLogger는 HTTP요청 당 각각 구분되므로 다른 HTTP요청 때문에 값이 섞이는 걱정은 하지 않아도 된다.
➕참고
requestURL을 MyLogger에 저장하는 부분은 컨트롤러 보다는 공통 처리가 가능한 스프링 인터셉터나 서블릿 필터 같은 곳을 활용하는 것이 좋다. 여기서는 예제를 단순화하기 위해 컨트롤러를 사용해 로거를 구현했다.LogDemoService추가
package com.hello.core.web; import com.hello.core.common.MyLogger; import lombok.RequiredArgsConstructor; import org.springframework.stereotype.Service; @Service @RequiredArgsConstructor public class LogDemoService { private final MyLogger myLogger; public void logic(String id) { myLogger.log("service id = " + id); } }- 비지니스 로직이 있는 서비스 계층에서도 로그를 출력해보자.
- 여기서 중요한점이 있다. request scope를 사용하지 않고 파라미터로 이 모든 정보를 서비스 계층에 넘긴다면, 파라미터가 많아서 지저분해진다. 더 문제는 requestURL 같은 웹과 관련된 정보가 웹과 관련없는 서비스 계층까지 넘어가게 된다.웹과 관련된 부분은 컨트롤러까지만 사용해야 한다. 서비스 계층은 웹 기술에 종속되지 않고, 가급적 순수하게 유지하는 것이 유지보수 관점에서 좋다.
- request scope의 MyLogger 덕분에 이런 부분을 파라미터로 넘기지 않고, MyLogger변수에 담아서 해당 정보를 MyLogger 인스턴스 객체가 존재하는 동안 사용할 수 있다. 그러므로 써 코드와 계층을 깔끔하게 유지할 수 있다.
기대하는 출력
[dd08997g...] request scope bean create
[dd08997g...] [http://localhost:8080/log-demo] controller test
[dd08997g...] [http://localhost:8080/log-demo] service id = testId
[dd08997g...] request scope bean close실제 기대와 다르게 애플리케이션 실행 시점에서 오류 발생
⛔ Error creating bean with name 'myLogger': Scope 'request' is not active for the current thread; consider defining a scoped proxy for this bean if you intend to refer to it from a singleton;
스프링 애플리케이션을 실행하는 시점에는 싱글톤 빈의 경우는 생성되 되었기 때문에 주입이 가능하지만, request 스코프 빈은 아직 생성되지 않았다. 따라서 해당빈은 실제 고객의 요청이 와야지만 생성되고 사용할 수 있다.
[출처 - 스프링 핵심 원리 - 기본편]
스프링 핵심 원리 - 기본편 - 인프런 | 강의
스프링 입문자가 예제를 만들어가면서 스프링의 핵심 원리를 이해하고, 스프링 기본기를 확실히 다질 수 있습니다., 스프링 핵심 원리를 이해하고, 성장하는 백엔드 개발자가 되어보세요! 📢
www.inflearn.com
'FrameWork > Spring&Spring-boot' 카테고리의 다른 글
SpringBoot - SpringBoot API 시작하기 (0) 2024.01.31 스프링 MVC 2 - 메시지, 국제화(소개, 스프링 메시지 소스 설정) (0) 2023.12.07 Spring 기본 36 - 프로토타입 스코프(싱글톤 빈과 함께 사용시 Provider로 문제 해결) (0) 2023.11.30 Spring 기본 35 - 프로토타입 스코프 (싱글톤 빈과 함께 사용시 문제점) (0) 2023.11.30 Spring 기본 34 - 프로토타입 스코프 (1) 2023.11.29