-
Sequelize - 실전활용(Update,Delete,Relation설정)FrameWork/ORM 2024. 4. 24. 11:23
Sequelize 실전활용
Update - catch~then 체인과 pk를 이용
exports.postEditProduct = (req, res, next) => {
  const prodId = req.body.productId;
  const updatedTitle = req.body.title;
  const updatedPrice = req.body.price;
  const updatedImageUrl = req.body.imageUrl;
  const updatedDesc = req.body.description;
  Product.findByPk(prodId)
  .then( product =>{
    product.title = updatedTitle;
    product.price = updatedPrice;
    product.imageUrl = updatedImageUrl;
    product.description = updatedDesc;
    //prodcut가 존재한다면 수정
    //그렇지 않는다면 새로생성
    return product.save();
  })
  .then( result => {
    console.log('UPDATE PRODUCT!');
    res.redirect('/admin/products');
  })
  .catch(err =>console.log(err))
};
일단 findByPk메서드를 이용해 해당하는 primary key 데이터가 존재하고 있는지 확인하고 해당 데이터를 then 메서드를 통해 받았다면 then메서드 안에서 해당 데이터에 원하는 부부을 수정하고 시퀄라이즈를 통해 DB와 소통을 통해 데이터를 변경한다. 이후 이 save 메서드에도 catch~then체인을 계속 해갈 수 있다. 하지만 그러면 가독성이 떨어지고 복잡한 코드가되므로 이결과를 retrun해 바로 다음에 then메소드를 붙여 product.save()에대한 결과를 반환 받는다.
Delete - catch~then 체인과 pk를 이용
exports.postDeleteProduct = (req, res, next) => {
  const prodId = req.body.productId;
  Product.findByPk(prodId).then(product => {
      return product.destroy();
    })
    .then(result => {
      console.log("DESTROYED PRODUCT");
      res.redirect('/admin/products');
    })
    .catch(err => console.log(err));
};
Sequelize의 1:1 ,1:N, N:M 관계 맺기(Relation)
app.js
sequelize.sync().then(result => {
    //console.log(result);
    app.listen(6300);
})
.catch(err =>{
    console.error(err);
});
위 코드는 서버 어플리케이션을 실행하기 앞서 프로젝트에 정의된 Sequelize 모델에 정의 된 내용을 기반으로 DB테이블에 해당 내용을 sync해주는 코드이다.
app.js
const sequelize = require('./util/database');
const Product = require ('./models/product');
const User = require ('./models/user')

Product.belongsTo(User,{constraints: ture, onDelete:'CASCADE'})
User.hasMany(Product);


sequelize.sync().then(result => {
    //console.log(result);
    app.listen(6300);
})
.catch(err =>{
    console.error(err);
});
이제 DB와 프로젝트의 모델 정의 사항을 sync하기전에 app.js에 모델 정의 사항을 import하고 이 두 모델의 relation을 설정할 수 있다. 즉 sequelize를 DB와 동기화 하는 코드의 위치와 동일한 곳에 product와 user의 연관을 짓는다.
Product.belongsTo(User)
Product가 User에게 속하고 즉 사용자가 이 제품을 생성했다는 뜻이다. User 말고도 두번째 인수를 전달하여 구성정보를 전달하는 것도 가능하다. 이 구성 정보는 이 관계가 어떻게 관리될 지 정의할 수 있다. constraints : true는 외래키에 대한 제약조건을 설정하겠다는 의미이다. 뒤이어온 onDelete:'CASCADE'는 특정 User 데이터가 삭제되었을때 User의 종속되어 있는 Product 테이블 데이터도 삭제하겠다는 의미이다.
User.hasMany(Product)
사용자는 하나 이상의 Product 데이터를 종속시키고 있다는 의미이다. 하지만 Product.belongsTo()를 정의 했다면 이를 꼭 정의 하지 않아도 되고, 이는 선택사항이 된다. 하지만 이렇게 양방향 정의가 User-Product의 작용방식을 더 분명히 한다.
위와 같은 Relation이 설정된 상태에서 sequelize sync는 모델에 대한 테이블을 생성할 뿐만 아니라 위 메서드를 통해 정의한 관계를들 데이터베이스 내부에 정의 해준다.
sync({force:true})
app.js
const sequelize = require('./util/database');
const Product = require ('./models/product');
const User = require ('./models/user')

Product.belongsTo(User,{constraints: true, onDelete:'CASCADE'})
User.hasMany(Product);


sequelize.sync().then(result => {
    //console.log(result);
    app.listen(6300);
})
.catch(err =>{
    console.error(err);
});
force: true는 프로덕션 환경에서는 ⛔권장되지 않는 설정 사항이지만 만약 Product 테이블을 먼저 생성했고 User테이블을 추후에 생성한 개발 환경에서사용 할수 있다. 이런 기능은 테이블에 새로운 변경사항들을 반영할 수 있게한다.

다시 프로젝트를 시작하면 위와 테이블변경을 위해 쿼리가 실행되었고 해당 쿼리가 출력되는 것을 확인할 수 있다. 하지만 위 쿼리에서 보다 시민 테이블 관계추가시 기존 테이블을 모두 DROP하고 새로 생성하는 극단적인 쿼리가 실행될 수 있으므로 개발환경에서 사용하더라도 주의가 필요한다.
app실행시 조회와 user와 미들웨어에서 조회한 user
app.use((req, res, next) => {
    User.findAll({limit:1})
})

sequelize
.sync()
//.sync({force:true})
.then(result => {
    //console.log(result);

    //인증 기능이 없으므로 최소한
    //user 1명이 존재하는지 확인
    return User.findAll({limit:1})

})
.then(user =>{
    // 최소한 하나의 user도 존재하지 않는 경우
    if(user.length < 1){
        return User.create({name:'Max', email:'test@example.com'})
    }
    return user;
})
.then( user =>{
    //console.log(user);
    app.listen(6300);
})
.catch(err =>{
    console.error(err);
});
이 미들워어에서 user를 조회한것을 promise 체인에서 사용할수 있을까? 하지만 app.use는 미들웨어를 등록할 뿐이라는걸 기억하자 따라서 해당 어플리케이션에 들어오는 request에 대해 app.use()안에 등록된 함수를 실행하게 된다. 반면 npm run start의 명령어에 의해 프로젝트가 시작되고 sequelize.sync()함수가 실행된다. 즉 두 함수의 실행 트리거가 다르다. 또한 request에 의해 실행되는 app.use()안에 등록된 미들웨어는 app.listen()이 정상적으로 실행된 경우에만 작동할 수 있다.
미들웨어를 사용해서 임시로 req에 user 정보 추가
app.use((req, res, next) => {
    User.findByPk(1)
    .then(user =>{
        req.user = user;
        next();
    })
    .catch(err =>{
        console.log(err);
    })
});
미들웨어에서 조회안 user를 req 객체에 등록해서 다음 핸들러로 넘겨준다.사용자 인증기능과 로그인 기능이 아직 구현되지 않은 해당 어플리케이션에서 위기능은 임시로 로그인한 회원정보를 넘겨주는 역할을 한다.
시퀄라이저를 통해서 DB에서 검색해온 user는 단순히 key-value쌍 JSON이 아니라 데이터베이스의 값을 포하마는 시퀄라이브 객체이며 이 시퀄라이즈 객체는 시퀄라이즈에서 제공하는 destory를 비록한 기능성 메서드를 포함한다.
다음 단계의 함수에서는 req.user를 통해 받은 시퀄라이즈 user객체를 사용해서 해당 사용자와 관련된 신규 제품을 생성하는 로직을 추가한다.
가상으로 로그인된 회원에게 관련된 제품정보 생성
방식1
 Product.create({
    title,
    imageUrl,
    price,
    description,
    userId : req.user.id
  })
방식2
req.user.createProduct({
    title,
    imageUrl,
    price,
    description,
  })
Product 객체를 사용해서 데이터를 사용할 수도 있지만 req.user를 통해 전달받은건 시퀄라이즈의 다양한 기능을 가지고있는 시퀄라이즈 user객체이다. 또 user 객체와 product 객체는 이미 사전에 Product.belongto(User), User.hasMany(Product)메드를 통해 두 객체에 관한 관계가 정의가 되어있으므로 user 인스턴스에도 createProduct라는 메서드가 사용할수 있게내장되어있다.
즉 시퀄라이즈는 객체가 DB에서 관계설정을 할수 있도록 인터페이스를 제공하며 모델들이 서로를 인식할 수 있게 하는 멋진 방법이다.
1:N 현재 접속중이 사용자의 Product만 조회해 오기
//등록된 Product 수정
exports.getEditProduct = (req, res, next) => {
  const editMode = req.query.edit;
  if (!editMode) {
    return res.redirect('/');
  }
  const prodctId = req.params.productId;
  //Product.findByPk(prodctId)
  req.user.getProducts({where:{id:prodctId}})
  .then(products => {
    const product = products[0];
    if (!product) {
      return res.redirect('/');
    }
    res.render('admin/edit-product', {
      pageTitle: 'Edit Product',
      path: '/admin/edit-product',
      editing: editMode,
      product: product
    });
  }).catch( err => console.log(err))
};

//Product 조회
exports.getProducts = (req, res, next) => {
  Product.findAll()
  req.user.getProducts().then(products => {
    res.render('admin/products', {
      prods: products,
      pageTitle: 'Admin Products',
      path: '/admin/products'
    });
  })
  .then(err =>{
    console.log(err);
  })
};
N:M Cart와 Product의 다대다 관계
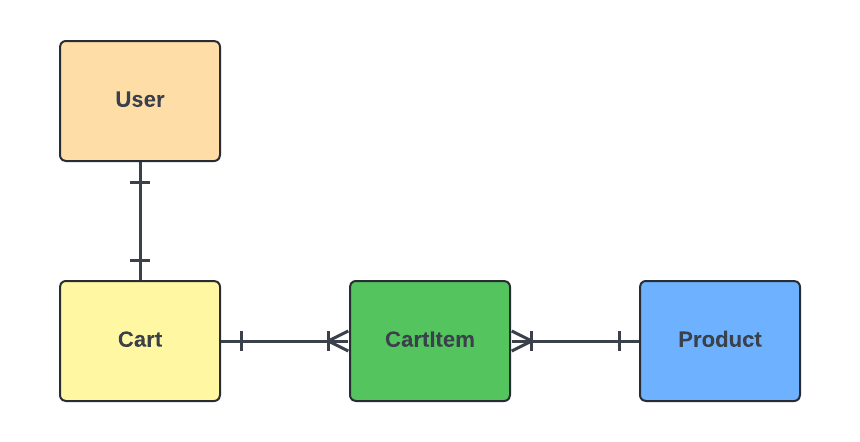
Cart1개는 User 1명에게 속하고 1개의 Cart는 각각 제품들을 사용자가 원하는 수량만큼 담고 있다. 즉 Carts는 여러개의 Product를 가질수 있고 Product역시 여러개의 Product를 가질 수 있는 N:M의 구조이다. 그래서 이들의 연결해줄 조인테이블이 필요하다.
app.js
const sequelize = require('./util/database');
const Product = require ('./models/product');
const User = require ('./models/user');
const Cart = require('./models/cart');
const CartItem = require('./models/cart-item');

//1:N
Product.belongsTo(User,{constraints:true,onDelete:'CASCADE'})
User.hasMAny(Product);

//1:1
User.hasOne(Cart);
Cart.belongsTo(User);

// N:M
Cart.belongsToMany(Product, {through : CartItem});
Product.belongsToMany(Cart, {through : CartItem});
Cart와 Product는 서로가 서로에게 belongsToMany()를 형성한다. 위 그림을 통해 알수 있듯이 이런 다대다의 관계에는 Cart Id와 Product Id의 조합을 저장하는 중개 테이블 혹은 조인 테이블(CartItem)을 통해 이들이 연결된 경우에만 작동하게 된다.
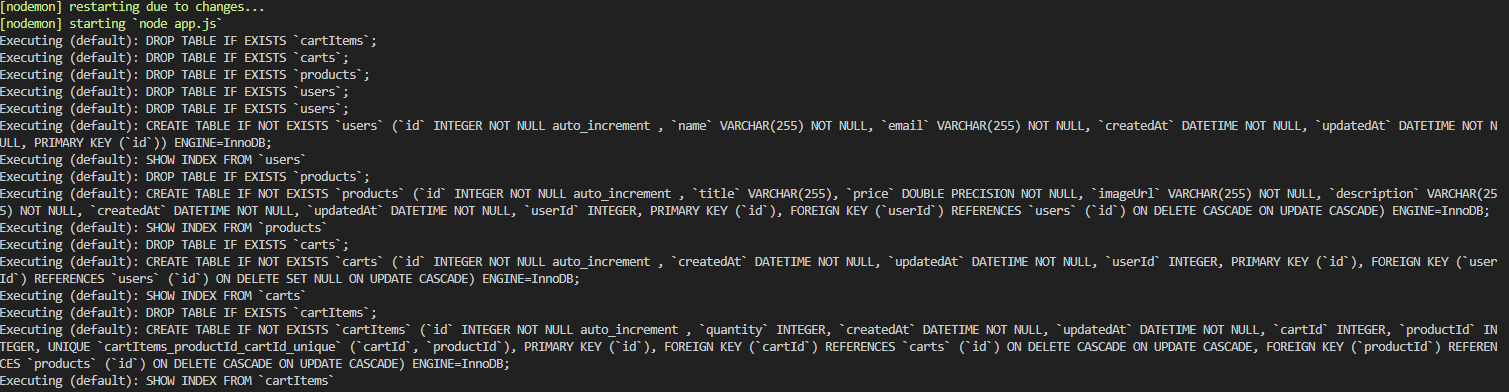
through 속성을 통해 시퀄라이즈에게 Cart와 Product의 관계를 연결시켜주는 모델(테이블)을 알려준다. 다시 임시로 sync({force:true})로 설정을 바꾸로 재시작하면 위와 같이 모든 테이블이 Drop 된 뒤에 모델 설정대로 새롭게 테이블을 생성시킨 쿼리문 출력을 확인할 수 있다.
Cart에 물건추가하기
- 경우1 : 이미 cart에 있는 물건 추가하는 경우
- 경우2 : cart에 최초로 추가하는 경우
shop.js
exports.postCart = (req, res, next) => {
  const prodId = req.body.productId;
  let fetchedCart;
  req.user
  .getCart()
  .then(cart =>{
    //Cart속성중 product 객체 반환
    fetchedCart = cart
    return cart.getProducts({where: {id: prodId}});
  })
  .then(async (products) =>{
    let newQuantity = 1;
    //products 중 첫번째 요소 반환
    //product가 하나도 없을시 undefined
    let product;
    if(products.length > 0){
      product = products[0];
    }

    //경우1 Cart에서 해당제품 수량 추가
    if(product){
      const oldQuantity = product.cartItem.quantity;
      newQuantity = oldQuantity + 1;
    }

    //경우2 Cart에 최초로 Product 추가
    //Cart에는 없지만, DB에는 정보가 있을것이다.
    product = await Product.findByPk(prodId)

    //경우1,2에서 찾은 product를 cart에 추가한다.
    return fetchedCart.addProduct(product, { through: {quantity:newQuantity} });
  })
  .then(()=>{
    res.redirect('/cart');
  })
  .catch(err => console.log(err));
};
경우1과 경우2가 반환하는 값이 매우 다를것이기때문에 경우2에서는 값을 return 한뒤에 바로오는 then()메서드에서처리하지않고, then()메서드에서 한번만 then()메서드를 중첩시킨다.
일단 시퀄라이즈를통해 조회한 cart 인스턴스를 let fetchCart 인스턴스에 넣어주어 함수내의 전역 변수로만들어 다음 then()메서드에서도 사용가능하도록 한다. 그 다음 중첩된 then메서드에서 사용된 fetchedCart.addProduct()메서드는시퀄라이즈가 N:M 관계에서 제공하는 메서드로 첫번째 인자는 product 정보가 된다. 두번째로는 Cart와 Product의 서로의 belongstoMany(xxx, {through:CartItem})을 성정할때 조인테이블이 었던 CartItem에 속성 정보 중 각각 Cart id와 Product id를 제외한 나머지 CartItem을 생성하는데 필요한 정보가 된다. 즉 객체의 두번째 인자 는 throug:{quantiy:newQuantity}가된다. 위와 같은 시퀄라이즈가 제공하는 인터페이스를 통해서 더 직관적인 코드를 작성할수 있다.
Order 리소스만들기
sequelize - model → order.js
const Sequelize = require('sequelize');

const sequelize = require('../util/database')

const Order = sequelize.define('order',{
    id:{
        type: Sequelize.INTEGER,
        autoIncrement: true,
        allowNull: false,
        primaryKey: true
    },
    address:{
        type:Sequelize.STRING,
    }
})

module.exports = Order;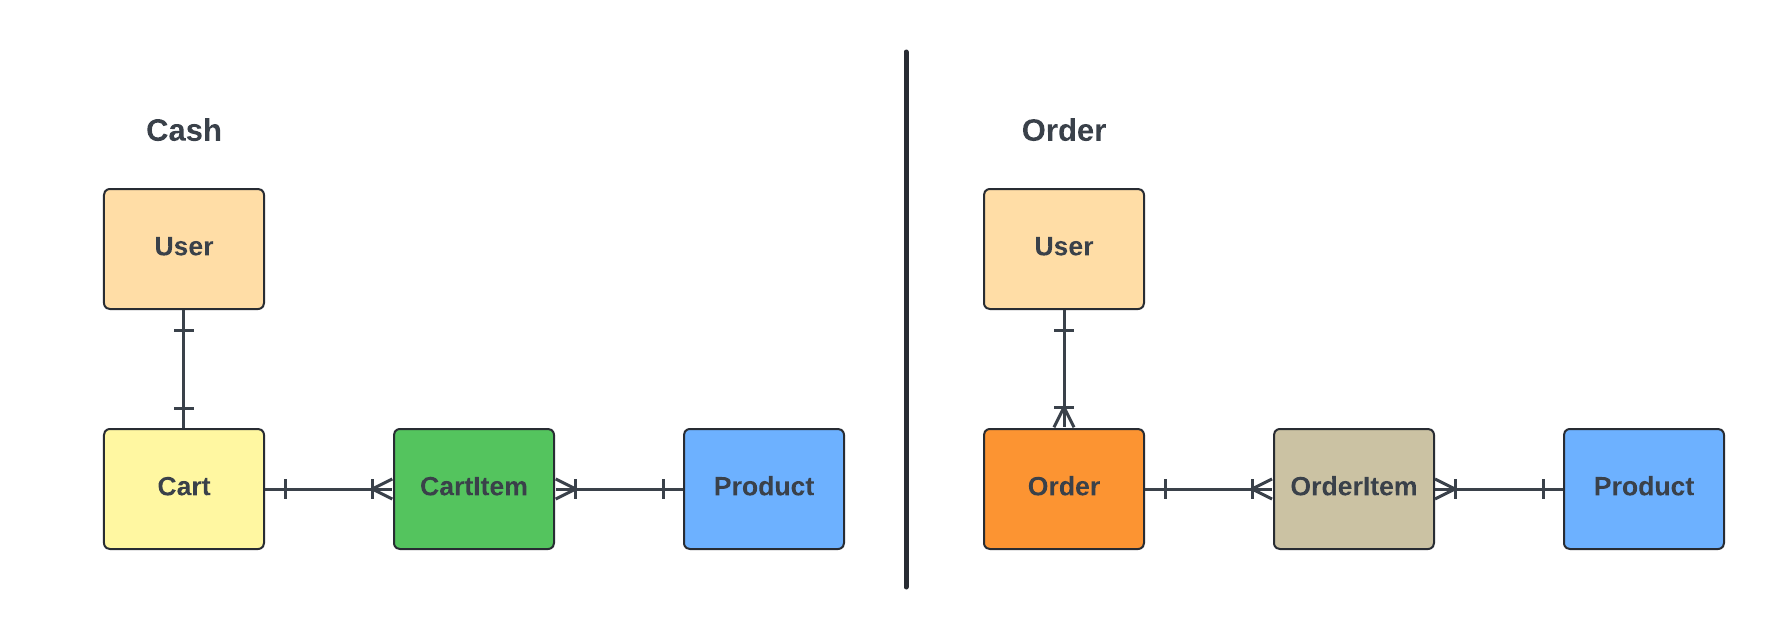
Order은결국 여러개의 Product 와 한명의 User사이의 관계테이블이이된다. 때문에 Order 테이블도 Cart와 마찬가지고 Product에 대한 정보와 Product에 대한 수량 정보가 필요하다. 또한 Cart 테이블이 해당정보를 CartItem 라는 Product 와 의 조인 테이블에 컬럼에 기록하게 한거 처럼 Order 테이블도 Product와의 관계를 기록하는 OrderItem 테이블을 만든다.
sequelize - model → order-item.js
const Sequelize = require('sequelize');

const sequelize = require('../util/database')

const OrderItem = sequelize.define('orderItem',{
    id:{
        type:Sequelize.INTEGER,
        autoIncrement:true,
        allowNull:false,
        primaryKey:true,
    },
    quantity: Sequelize.INTEGER
});

module.exports = OrderItem;
order와 관련된 관계설정
const sequelize = require('./util/database');
const Product = require ('./models/product');
const User = require ('./models/user');
const Cart = require('./models/cart');
const CartItem = require('./models/cart-item');
const Order = require('./models/order');
const OrderItem = require('./models/order-item');

// 1:N
Product.belongsTo(User,{constraints: true, onDelete:'CASCADE'})
User.hasMany(Product);

Order.belongsTo(User,{constraints: true, onDelete:'CASCADE'})
User.hasMany(Order);

// 1:1
User.hasOne(Cart);
Cart.belongsTo(User);

// N:M
Cart.belongsToMany(Product, {through : CartItem});
Product.belongsToMany(Cart, {through : CartItem});

Order.belongsToMany(Product,{through : OrderItem});
Product.belongsToMany(Order,{through : OrderItem});
Cart에 담긴 Product 정보를 바탕으로 Order 정보를 생성
exports.postOrder = async (req, res, next) => {
  const cart = await req.user.getCart();
  const products = await cart.getProducts();
  const order = await req.user.createOrder();
  const result = await order.addProducts( products.map(product => {
    product.orderItem = { quantity: product.cartItem.quantity };
    return product
  }));
  console.log(result);
  res.redirect('/orders');
};
이전 게시물에서 cart에 이미 있는 product혹은 DB에서 가져온 product 정보를 최초로 cart에 담는 코드를 작성할 때는 하나의 product에 대한 수량을 1증가 시키기만 하면됐다 그에 미해 cart 정보에서 가저온 products 정보는 이러한 각각의 product 정보를 담고있는 배열의 형태이다.
이때는 새로운 수량을 구한다음 through 속성을 사용하는 것이 아니라 order.addProducts()의 인자로 products.map 함수를 전달한다. 해당 map 함수에서는 products의 각각 요소의 orderItem 속성에 객체 {quantity : product.cartItem.quantity}를 대입해 반환한다. 이렇게 되면 새로 생성된 order객체 그리고 그것과 연관된 orderItem 객체에도 각각 product에 대한 quantity 정보를 입력할 수 있다.
Order정보 생성하고 Cart에 넣은 정보 비우기
exports.postOrder = async (req, res, next) => {
  const cart = await req.user.getCart();
  const products = await cart.getProducts();
  const order = await req.user.createOrder();
  const result = await order.addProducts( products.map(product => {
    product.orderItem = { quantity: product.cartItem.quantity };
    return product
  }));


  cart.setProducts(null);
  res.redirect('/orders');
};
cart객체를 사용해서 setProducts(null)을 하면 DB에 있는 Products데이터가 null이 되는 것이 아니가 해당 cart 인스턴스와 N:M 관계로 연관되어있는 Product의 데이터들이 null사라지는 것이다.
[출처 - NodJS 완벽가이드 , Maxi ]
https://www.udemy.com/course/nodejs-mvc-rest-apis-graphql-deno/?couponCode=ST6MT42324
'FrameWork > ORM' 카테고리의 다른 글
Prisma - Transactions과 다양한 부가기능 (0) 2024.04.17 Prisma - 객체 간의 관계 설정, 1:N, 1:1, N:M (0) 2024.04.16 Prisma - 🐠시작하기 환경설정, 쿼리 로깅, CRUD (0) 2024.04.12 Sequelize - 시퀄라이즈 시작 (설정,모델만들기,관계설정) (0) 2024.03.21 ORM - 영속성 관리(플러시, 준영속) (1) 2024.02.29